
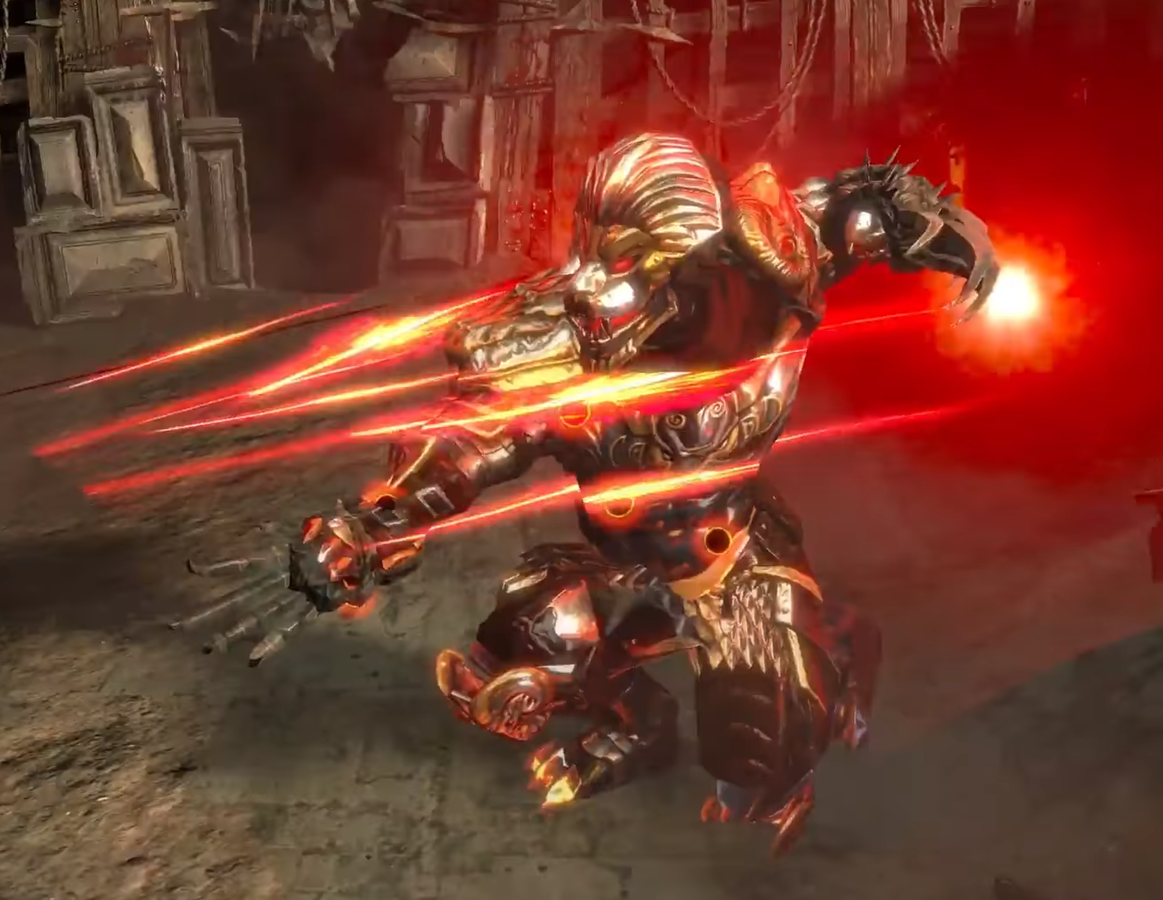

Welcome to the detailed guide for the tier 16 map, Pit of the Chimera. He is one of the four guardians that you will need to take on to fight Shaper in the Shaper’s Realm. Keep in mind that the Chimera is immune to freeze and knockback.
Fighting Mechanics
The fight revolves around Chimera and his 3 minion phases. This fight will test your damage and survivability, especially against his minions that is spawned when his health reaches 75%/50%/25%. If you lack damage, you won’t be able to kill his minions in time and die to damage overload. Below are the moves and things that can happen when fighting him:
Melee Attack → A basic melee attack that deals Physical Damage.
Recommendation: This move is not too deadly, and can be tanked. Ranged players can make an effort to keep distance between the Chimera to delay and possibly avoid this attack.

Flicker Strike→ The Chimera picks a target and flickers to it, dealing Physical Damage.
Recommendation: This strike does not deal deadly damage and can be tanked. Make sure to have proper mitigations up.
Flicker Lance → The Chimera strikes the chosen target location inflicting it with Bleeding, that lasts for 5 seconds. This move can be side stepped.
Recommendation: Make sure to have a Bleed Immunity flask ready to dispel the bleeding effect.

Charge Attack→ The Chimera charges up and strikes 3 times, dealing 60% of the basic melee attack Physical Damage each hit. This move can be side stepped.
Recommendation: Sidestep this move once you see him begin to charge up the attack.

Combo Attack→ A Red Circle appears on the ground around the Chimera. Anything within this area will be struck by the Combo Attack that the Chimera performs a few seconds after it is placed. This attack strikes between 5 & 6 times and deals 125% of his base physical damage per attack. This move is very deadly.
Recommendation: Move out of the red circle once it appears to avoid taking any damage from this attack.

Hidden Attack → Numerous smoke clouds appear, shrouding the Chimera within one of them. The player must travel through the smoke clouds to try and find the Chimera. He can be within any of the clouds, and will deal 80% of his base melee attack to the player consistently while they are trying to discover his location. This attack can not be evaded or dodged, and can only be stopped by finding the Chimera. This attack can occur multiple times after each add phase.
Recommendation: This is the toughest move that the Chimera performs, with a high probability of death. Make use of a fast movement skill or Quicksilver flask to find the Chimera as fast as possible. Sometimes you can get lucky and find him in the first cloud or get unlucky and find him in the the last cloud. I also suggest opening a portal right when you enter the arena so you can reset your flasks in case RNG is against you.
Minion Phase → For every 25% of health that the Chimera losses, he will retreat outside of the arena and release very strong adds in waves from the 3 cages in the top left, top right and bottom right corners in the arena. These minions are much stronger than average map monsters. They occur in the following monster types:
- Guardian’s Goatmen → Leap and deal Physical Damage
- Guardian’s Snakes → Fire ranged projectiles that deal Chaos Damage
- Guardian’s Hellion → Attack with melee and deal Fire Damage
Keep in mind that there is no particular order which minions will show up first and it is completely random. Also, the mini bosses will always spawn on the bottom right cage!
Preparing Against the Chimera
To fight against Chimera, you will want to prepare physical mitigation and bleeding. Elemental defense isn’t needed but a little bit of chaos resistance will help against the snakes in the minion phase.
Skills or Items for Defense
The Death’s Door is a great item to prevent the Chimera from inflicting bleed on you. However, it can be quite pricey and can fluctuate depending on the demand for it.


Skills such as fortify and endurance also helps with physical damage reduction. Some examples are:
- Shield Charge + Fortify + Faster Attacks
- Vigilant Strike
Movement skills like Whirling Blades, Leap Slam with Faster Attacks is also useful during the smoke screen (hidden attack) phase. Also, any sort of life leech and Vaal Pact passive will make it easier for you to tank his damage.
Flasks
Below are the flasks that will help you survive in this boss fight.

Flask (with staunching) – Bleed removal is important to avoid taking too much damage.

Quicksilver Flask – The prefixs don’t matter. However, if you can additional movement speed would really help as you can run quickly during the smoke screen phase to avoid taking too much damage.

Blood of the Karui – A very underrated life flask. You get healed to full health after 2.7 seconds. Very helpful during smoke screen phase and the hard hitting minions.

Basalt Flask – Helps reduce physical damage taken from the Chimera and some of the minions.

Amethyst Flask – If you have trouble with the snake minions, this flask will help.
For prefix, look for the following:
Ample – +(10 to 20) Maximum Charges. This allows you to get 1 more use if you can get max charges.
Experimenter’s – (30 to 40)% increased Duration. This actually is a life saver and improves your quality of life.
Chemist’s – (20 to 25)% reduced Charges used. Can sneak in another use on flasks like the Basalt Flask.
For suffix, look for the following:
of Staunching -> Removes bleeding!
of Iron Skin -> Increases 60-100% armor. Very useful in mitigating more physical damage when paired with the Basalt or Granite Flask.
of Reflexes -> Increases 60-100% evasion. Very useful with innate high evasion rating.
Dangerous Map Affixes
Since the Chimera is physical damage based, you will want to avoid stacking too much of the following affixes:
- Players are cursed with vulnerability (increased chances of bleeding and more physical damage taken)
- X% increased monster damage
- X% increased monster attack speed
- X% increased monster life (takes longer to kill and you get punished for making a mistake)
- Deal X% as extra fire/lightning/cold damage
- Unique bosses deal X% increased damage
- X% increased critical strike chance
- -X% maximum player resistances
As a good rule of thumb, avoid stacking 2 or more damage mods to ensure you can finish the map just fine.
Fighting Guide
It is recommended to have at least 5.5k health or 7k energy shield with sufficient damage to comfortably do this. Before you entire the arena, open a portal so you can always come back to the fight if you die. When you enter the arena, you have about half a screen to walk before the fight gets triggered. Alternatively, you can use the portal right at the gate when you enter the arena.

Upon entering, you have about 5-6 steps before the fight triggers. Most of Chimera’s attacks have a short delay, allow you to avoid his attacks. It is much easier avoid as a ranged character since you can use things like Decoy Totem to draw attention away from you. As a melee character, you will need to tank some of his attacks.
He will most likely use flicker strike as his first attack. Do a merry go round. It is quite easy to dodge it. As for his combo attack, you will need gauge whether you can tank it or not. It best to run outside of the red circle to avoid taking damage and continue to damage him when the circle goes away.
Upon taking away 25% of his health, he will disappear and start spawning the first minion phase. As mentioned above, the minions that come out of the cages (left, right and top) are random. The good thing is, the boss spawns on the right side of the cage. However, it only spawns after you have cleared 2 rounds of minions. A key tip to the minion phase is to stick to one side and try to kill 3 minions from a cage as fast as possible. Then head to the next one.
The last thing you want to do is to lure all of them to the center. These minions do a lot of damage. Unless you have a tanky build, you won’t be able to soak up all that damage. If you lack chaos resistance, watch out for the snake minions. They will do quite a bit of damage if your chaos resistance is -60%. Bring an amethyst flask with you. Evasion flasks work well here as you can avoid quite a bit of damage if your evasion is over 30%.
Upon killing the mini boss in the minion phase, the Chimera re-appears in the center. He will almost follow up with the smoke screen attack. This is where you want to quickly pop your quicksilver flask or any movement skill to find him in the smoke screens. Sometimes, you are unlucky and find him on the last one. To avoid dying, you can head back into your town portal if you actually had it just at the entrance. This phase is also very troublesome if your map has 2 or more damage mods and you don’t have enough life or energy shield to cope with it.
Keep pummeling him after you find him in one of his smoke screens. He will go into minion phase again at 50%/25% health respectively. The entire cycle will then repeat. Keep in mind that the smoke screen phase can be triggered multiple times if you don’t do enough damage to take his health down quickly. As a rule of thumb, if you take more than 1 minute to take his health from 100% to 75% during boss phase, you don’t have enough damage.
Drops and Rewards

Fragment of the chimera will drop upon death. This is required to unlock the Shaper’s realm to take on Shaper himself.

Obscurantis – An okay helmet for ranged attackers. Not very popular though.

The Scourge – A decent claw for Necromancers that would like a boost in minion damage. The spectral wolfs can also serve as distractions.

